What is YARA?
YARA is the swiss-army knife for pattern matching. It is easy to use, fast and powerful which already led to a quick adoption of it in a variety of platforms.
It provides unprecedented capabilities for finding the evil with only a few lines of script. This goes the same for Incident Response and compromise assessment.

How does it work?
That’s simple:
-
Open up your favorite text editor,
-
Write simple rules composed of a few sections (described below),
-
Ask YARA to run them against a set of files or processes,
-
That’s all! Watch YARA finding the evil for you!
Basic Structure of a YARA Rule
YARA Rules are simply composed of 4 main parts as highlighted below:
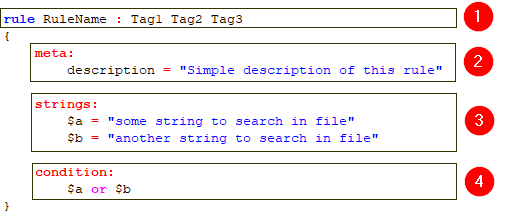
1. Header Section
The header section is the first section of a YARA rule and it always starts with the keyword rule followed by an optional tags section. You can define any number of tags here.
2. Meta Section (optional)
This is the place you define any number of meta descriptions for your rule. Think of meta descriptions as your notes to users of this rule.
3. Strings Section (optional)
The strings section is one of the most important part of a YARA rule and it is where you define what to search for.
As an example, the above rule defines two strings to search in file contents.
4. Condition Section
As you already see in the above example, this rule will be evaluated as matched in case one of the strings are found in file contents. You can easily change the “or” operator with an “and” operator for making sure both strings are found in the file.
This is just a simple example, more complex and powerful rules can be created by using wild-cards, case-insensitive strings, regular expressions, special operators and many other features that you’ll find explained in YARA’s documentation.
YARA Modules
Modules are the method YARA provides for extending its features. They allow you to define data structures and functions which can be used in your rules to express more complex conditions.
As of version 3.8.1, YARA ships with PE, ELF, Cuckoo, Magic, Hash, Math, Dotnet, and Time modules. You can see what each module provides by visiting YARA modules documentation page YARA documentation.
To give you an example, you can use Hash module for finding a file with MD5 hash value of feba6c919e3797e7778e8f2e85fa033d as below:
condition:
   hash.md5(0, filesize) == "feba6c919e3797e7778e8f2e85fa033d"
Modules provide a really great opportunity for combining YARA’s pattern matching capabilities with file format specific conditions.
IR Modules for YARA
Now you have a basic understanding of how YARA rules are composed and how they can be extended with the help of modules.
Great! But wait a second. Wouldn’t it be great if we were able to add more contextual information such as process name, command line, file times, file name, file extension, and file attributes?
That’s what we thought a few months ago which led to the development of IR oriented YARA modules for providing better Triage and IoC Scan capabilities.
These modules are special to IREC’s implementation of YARA 3.8.1 and by the help of an embedded YARA Editor with an autocomplete support, writing an IR oriented YARA rule takes only a few minutes. Plus, IREC automatically verifies the rule and makes sure it doesn’t have any syntax errors.
See the example below for finding PowerShell executables by using “process” module.
Note: Typing CTRL + . sequence automatically brings up the auto-complete dialog and makes it really easy to write YARA rules just by selecting the appropriate property from a list.
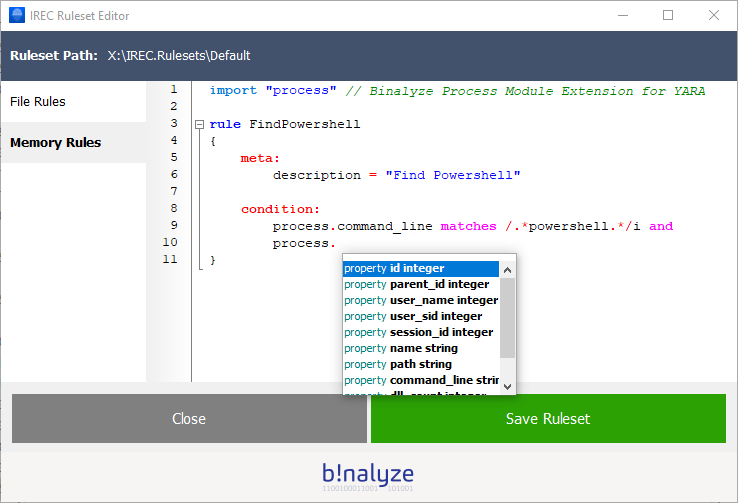
As of IREC version 1.6.2, we provide the following modules with listed attributes/methods:
File module
-
name (string): Name of the file including extension. Example: document.docx
-
extension (string): Extension of file. Example: docx
-
readonly (boolean): Is this a read-only file?
-
hidden (boolean): Is this a hidden file?
-
system (boolean): Is this a system file?
-
compressed (boolean): Is this a compressed file?
-
encrypted (boolean): Is this an encrypted file?
-
modified_time (integer): File’s modification time in YYYYMMDDHHMMSS format
-
accessed_time (integer): File’s last access time in YYYYMMDDHHMMSS format
-
changed_time (integer): File’s change time in YYYYMMDDHHMMSS format
-
birth_time (integer): File’s MFT entry creation time YYYYMMDDHHMMSS format
Process Module
-
id (integer): Process id
-
parent_id (integer): Parent process id
-
user_name (integer): Username of process
-
user_sid (integer): SID of process user
-
session_id (integer): Session id of process
-
name (string): Process name
-
path (string): Full path of process
-
command_line (string): Command line of process
-
dll_count (integer): Count of loaded dlls
-
dlls (array): Array of loaded dlls
Time module
-
now() (returns integer): Function returning current Unix Timestamp
-
around(source_date, target_date, time_frame) (returns integer): Function for determining if a source date is within the time frame of a target date
External Variables
Extending YARA is not only limited to writing modules. There is also another great feature called “External Variables” and they allow you to define rules which depend on values provided from the outside.
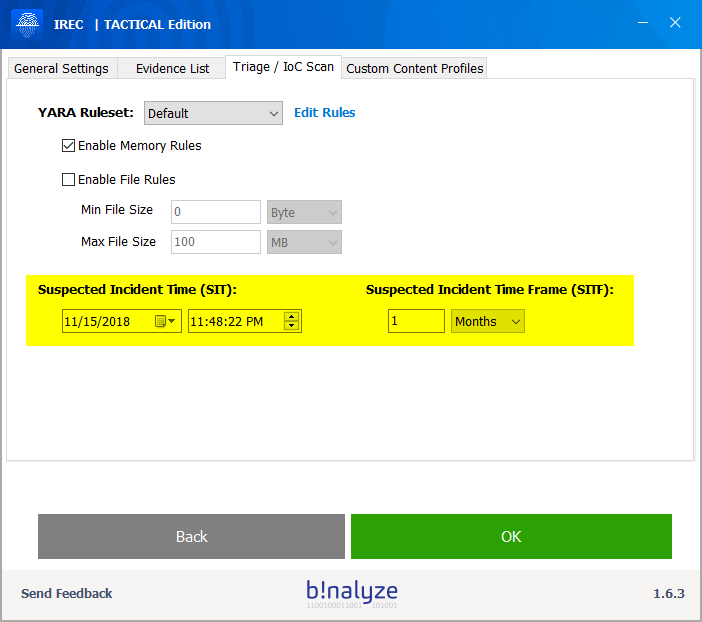
Using this feature, IREC defines two external variables which can easily be adjusted from Settings > Triage / IoC Scan section as shown below.
SIT (Suspected Incident Time)
SIT or Suspected Incident Time is an external variable defined as a date-time value.
For the sake of simplicity, we internally define it in YYYYMMDDHHMMSS format so that you can easily use it with file, process and time modules.
Example:
Let’s write a script to find all files created after a specific time:
condition:

file.birth_time > SIT
SITF (Suspected Incident Time Frame)
SITF on the other hand, lets you define a time frame around SIT.
Example:
Let’s find all files created within a specific time window:
condition:

time.around(file.birth_time, SIT, SITF)
How SIT and SITF help you?
As you probably realized, you now have two rules based on dynamic values rather than depending on hard-coded ones.
So, you don’t have to edit these rules anymore for every incident response case you are involved in.
Just go to settings section and change their values using the calendar widget. Easy, isn’t it?
Let’s do some Triage
Now you learned what IREC adds upon vanilla YARA. Let’s combine all together and write a few example scripts which will our lives easier on a Triage mission.
1. Find all PDF files created after Suspected Incident Time
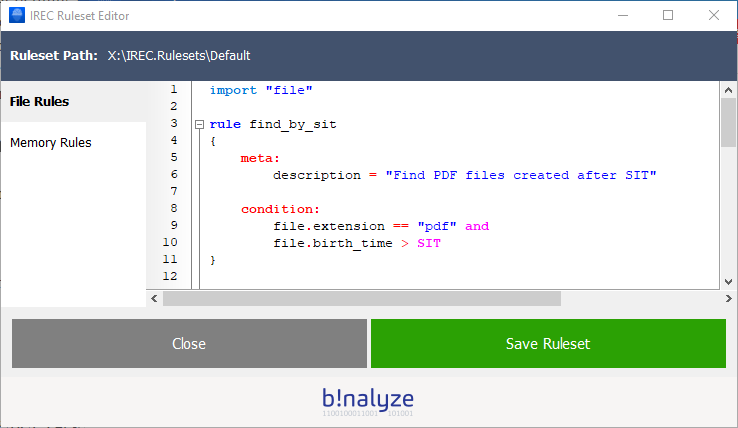
2. Find all PDF files created around Suspected Incident Time
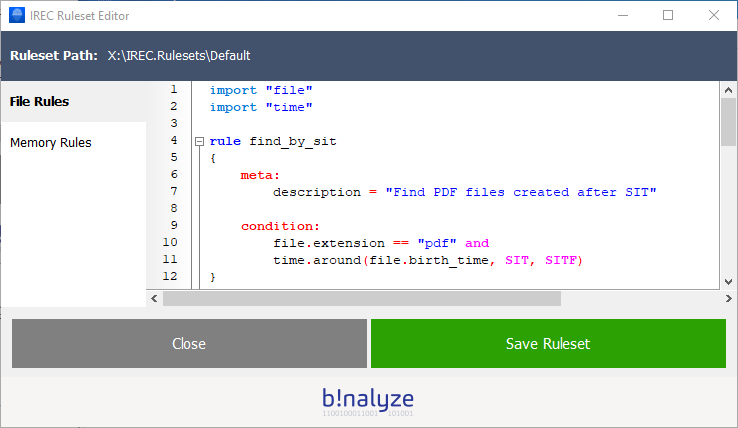
3. Find all PDF files created after a specific date time value
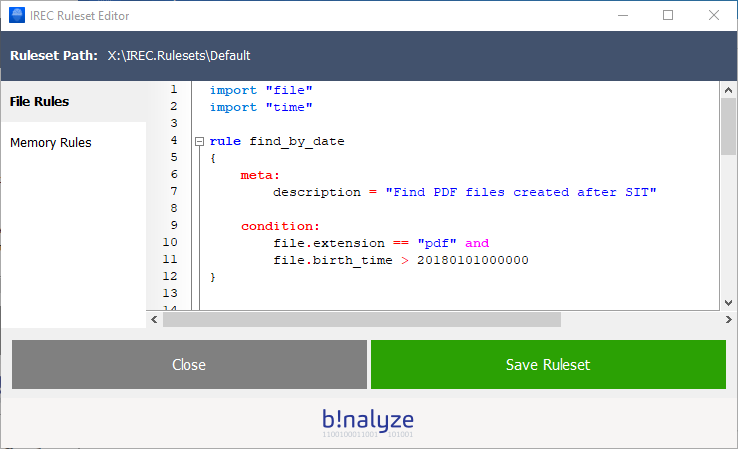
Saving the scripts, we are now ready to perform Triage on any machine. Just go back to home page and click “Start”.
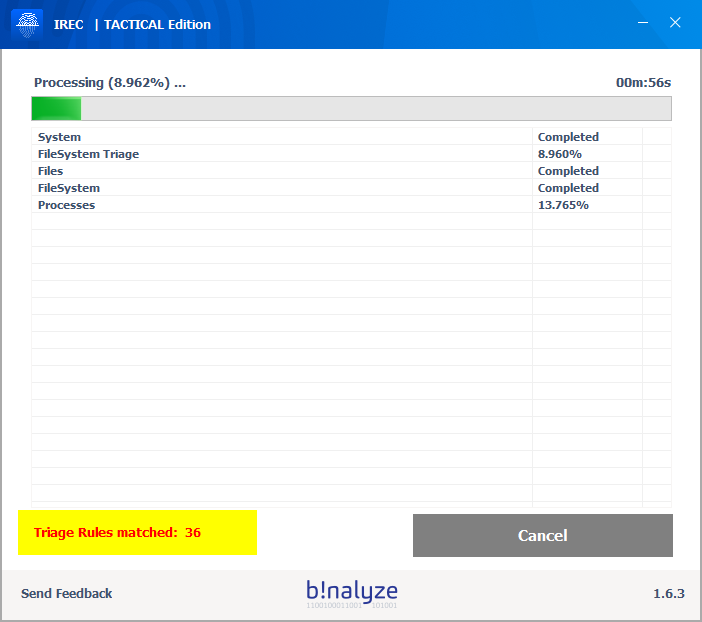
Even before the collection/triage process completes, you will have a chance to see how many files/processes are matched against the rules you provided as you can see below:
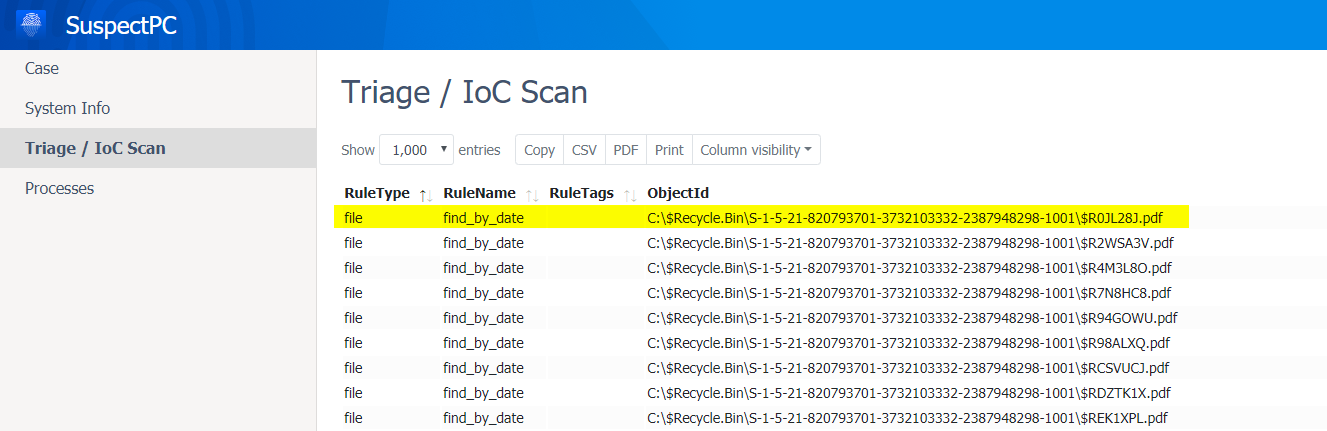
Results
Once the process completes, you can easily check which files are matched by simply opening the HTML report. Notice that we were even able to find files in Recycle Bin!
To summarize, using YARA with incident response oriented modules highly increases the speed and efficiency of a Triage / IoC Scan process. We will be demonstrating how to use YARA for Evidence Collection just by adding a simple YARA tag “collect” into your rules. So, stay tuned for the next blog post.